Saturday, August 10, 2013

Pinterest FAIL

It was bound to happen at some point but well I just wish it wasn't on something that required so much effort! You see my dear sweet children were not OK with letting it fail so we attempted not 1, not 2 but 3 times. REALLY!
What is it that we determined to make...rock candy. I mean how hard can it be to get sugar to crystallize? Apparently more difficult than I thought. Course the post I got the idea from also stated it took them 2 attempts to get it right. directions click here

 First, make sure to read ALL of the directions, every... single...word. An example would be continue adding sugar UNTIL it appears they liquid will no longer absorb more. That makes for fail number one.I never added the clothespin to keep the sticks straight and in the middle. (I know I have a real following directions problem when cooking, sorry!)


 THEN, use the right kind of sticks. I used paper wrapped sticks and not wood. I am pretty sure this makes a difference because on attempt three it was the ONLY part of the directions we did not follow exactly.


                                                                                                                                                                                                                                                                                                                                                         Here is the final product. As you can see it kinda  (not completely) worked, basically enough for the now desperate kids to semi eat. I a true sugar addict didn't think it tasted that great but who am I after all? How about you try? Feel free to post a comment and let me know if you were more successful than I, thereby confirming we stink at this but well its fun to hear :)


Click for better directions As you can see above it just didn't work quite right. There is tons of sugar in those glasses but well it didn't attach to the sticks.

Friday, August 9, 2013

Homemade fruit snacks and flip flops

Odd combination of activities I know but well kids are random like that. Heck, I am random like that. One is extremely easy and the other is VERY time comsuming. Neither are brand new ideas, one from Pinterest of course (where else?) and the other from observation of others. But they both were worthwhile!

This time of year flip flops are very inexpensive so you just need to find a pair the darker the color the better. The girls chose water balloons as the decor for theirs. It does take roughly 200+ for a pre-teen size foot to give you a starting place on purchasing if you choose. Thank goodness they are found in packs of 100 at the dollar store. Patterns make no difference in order because in the end you cannot even really tell unless you did all of one color making a rainbow.
Here is the finished product:

 Don't mind silly C sitting on the floor. This project took 2 days to complete though it was not worked on nonstop.
1 down, only 2 more to go.


Now to the real reason you are reading this post, homemade fruit snacks. They require 3 ingredients. 2 .25oz packets of unflavored gelatin (each box comes with 4 packets in it), 1 3oz package of any flavored jello and 1/3 cup water.
All you do is pour the water into a much smaller saucepan than I used and add the 3 packets. Then turn on medium heat and stir till dissolved.
Lastly, pour it into silicone molds as these are the easiest to get back out when set. It takes about 20 minutes to set and viola!
I purchased the jolly rancher flavors for a fun first attempt and they were gobbled up quickly. My molds were a bit large so we only filled them halfway. I will however look out for smaller molds to do this again. It was super quick and tasted great.
This is only part of them as I had to be quick or there would be nothing to show you.

Thursday, July 18, 2013

Summer Snowball fight and Homemade bubbles

As we have hit the halfway mark in Summer and August begins to be closer than the kids or I would like to admit it is time to pull out all the stops. You know schedule those playdates that you didn't get to yet, figure out when to where and on. The younger boys had football camp which put a wrench in my plans only that they would be starving and a bit tired when done with 2 hours of work in the heat. Keeping this in mind I got to the creating portion of activities to even out the staying home all week. Which idea should I go to next was the question since like most of you I have a whole board of ideas from Pinterest. Summer snowball fight, homemade bubbles and rock candy seemed like just the ticket. I will make the rock candy its own post because it is not complete and already took two attempts.
Homemade bubbles was pretty simple requiring 2 items dish soap and light corn syrup. I know there are literally hundreds of options around the internet on this subject but I stuck with this one. The website said it will last up to 2 weeks in an airtight container BUT since I didn't have one readily accessible so it is in a pitcher (which I made clear to ALL not to drink from). I made it on Monday and it still works on Thursday.


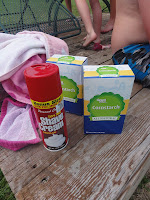
Today we had a snowball fight. Though in hindsight I should have whipped it up myself and then let them play with it but ya know how it is with 6 kids. They just can't stand not being involved. 
SIMPLE.. 2 boxes of cornstarch and 1 can of shaving cream. I would maybe do 1 1/2 cans next time though.

Simply mix together well and then make snowballs. This amount only makes about 6-8 good snowballs. I will double it in the future too.


After we threw the snowballs it turned into an attack on each other. The ingredients are so soft it was the most fun I have had with the kids in sometime. Guess which kid took the pictures because he didn't want to touch the messy stuff?

Tuesday, July 9, 2013

All Hands On Deck preschoolers!

What can I say? I have been gathering Pinterest idea after idea for the many months. Why oh Why did I resist joining Pinterest for so long? I do hate to run with the mainstream crowd but a good thing is truly a great thing sometimes!
ANYWAY.... here ya go. Some more fun, inexpensive, age appropriate, educational based (using fine motor skills) and critical thinking AND not terribly difficult ideas to do for those kiddos.

First, letter recognition practice using paper towel tubes and dot stickers. What more do I need to say? I would link the owner of this idea but I am afraid it is kinda everywhere so who knows where it started? Write letters on tube, matching letter on sticker and there ya go! I did a lower case and an upper case set for my soon to be K girl. She really needs more sound practice but this is fun while I am working with the "boys" on reading skills.

Next we have several items. Pool noodles cut into rings to stack/build/string. Although I have no idea what they would use to string them. My own children couldn't keep their hands AND feet out of the tub, lol.

Beside that are 8 bottles with rice, and/or beans, and/or blue sand in them. I placed random small items inside the bottles as I filled them to make I spy bottles (ie paper clip, brass tac, eraser, seas shell etc). I also took a picture of the items before I put them inside so the kids know what to look for when shaking the bottles around. I am in the process of laminating them so they can even use dry erase markers to cross off the items they find too. My big kids were less tempted with these at first but once littlest and I began checking them out they all joined in.

On the middle right is a box with sand at the bottom and brightly colored shells covering the sand. I would love to find some little shovels or something for "digging" in that box but haven't as of yet. I hid a few plastic fish, and a starfish inside that box too.

My previous post explains the sensory bags at the bottom right.

Here you see various sizes of screws with washers and nuts. The kids are to match the washers and nuts with the right screw and twist it all the way on. It requires some critical thinking and deductive reasoning to determine how to use all of them since bigger ones will fit on the smaller but then you will run out of pieces. I know many kids will give up before completing the entire task but some will stick it out. Either way it will occupy most for a short time. Here is the link for this idea: click here
My husband didn't make it exactly like post described but it works. I glued magnets to the top instead of underneath because they were not strong enough through the cardboard. This is truly 3.62 cents at Rural King in hardware, a pool chlorine box cut apart and some freebie refrigerator magnets I glued word side down. 
Lastly, I took a dishwasher tab box and hubby drilled holes to match those circle office stickers you can put on the holes in notebook paper. I know that was NOT a technical term but I honestly do not remember the official  name of the product:) 

I bought neon colored straws that were in a pack to match the stickers and there ya go. Hubby did have to smooth the holes out after he drilled but otherwise low cost too. Plus this tub can hold the package of straws inside it while not in use. 
Then because we needed something the kids could actually keep we made washer necklaces today. I had seen an idea to design them like a baseball and put child's number on it for a end of season gift but this seemed like a low maintenance fun anytime idea for the 5-13 year kiddos I have with me. These washers were very inexpensive too, I think less than 2.00 for 8 or 10 of them. They designed them with nail polish and I had some bright colored plastic string lying around from bracelet crafts. 

little one's face is because she is struggling to open the polish

The finished product is below. I forget to take a picture before niece and nephew took their home so these are just my kids. The one on the necklace is my design. Notice I made a heart( of course for those who know me). It kinda looks like lips but you have to tilt your head to the left because silly me uploaded it sideways. Oops!

Friday, July 5, 2013

Sensory bags

As the preschool coordinator for my church I get the pleasure of making fun things for little kids even though my youngest is now 5. The true test of a winning idea is when all the kids even the big ones can't stay away and want to try it out. You see my church is the where kids go to their children's classroom to take part in specially designed services (age appropriate) while parents attend the main service and can focus on the wisdom they hear. This means for the little ones ages 2-3, and 4-K I prepare/buy things to play with during the drop off time before service begins.
Here is yet another pinterest inspired idea. I am not sure how durable these will be as pre-service activities but while they last they will surely be worth every penny as my own kids couldn't leave them alone.
First gather hair gel, any kind really but I chose colored gel for added fun.
Next gather gallon sized ziploc bags and items to put in each bag, 

My little helper couldn't stay away. 

Squeeze the gel out, add the items and done. Easy peasy lemon squeezy! I chose marbles, army men, and nuts/bolts. I left one bag completely item free and double bagged the bolt one. The problem with double bagging is that the sensory is dulled a bit but does still work.
I also duct taped the openings to ensure they stay closed along with adding tape to the bottom of the double bagged one because it was a bit heavier. Sunday will be my first test run in the classroom.

Sunday, June 23, 2013

Bringing the snack shop BACK

I don't know about you all but my kids want to eat me out of house and home during the summer in snacks alone! I get tired of arguing or keeping track of who already had what each day before the ingest a whole box of fruit snacks so I devised the perfect way to control those eaters AND make it a learning experience they enjoyed. I know I posted this last year but it generated much discussion in real life so here it is again:


SNACK SHOP is officially open!

This is not all the items I have in the shop as that picture didn't show the signs very well. But you get the concept. 
How does it work?
Each snack item has a colored dot which designate a specific price. I included things like bagels with cream cheese, ice cream, crackers, etc. Soda, chips and candy are also available although their price is high enough that they will either budget to get it or run out of money because they did too often. Fruits and vegetables are always free. 
There is a price list that explains what each dot means displayed for all to see.The first time I did it I gave the kids a set amount of $ per week but as they grew I started giving them a blank check register with a set amount for the summer. Cousin K was the BEST at budgeting with tons of money left over, A the second best with indulging but choosing when to do so. 

Last year I used different pricing. Truly that is determined by how well the kids participating can make change, or need practice in counting money. This year I used  mostly amounts with quarters such as .25, .75 etc. All of my children (except 5yo) get how to use money so I am focusing on the budgeting portion most. This year I determined and average of 4.00 per kid should be plenty. I do NOT tell them my thought process because I want them to learn how to spread it out. So far no one has calculated how many days there are and divided it out. So those that actually know my family MUM is the word!

This year we are starting a month late because of camps, VBS etc so less $ needed.
Finally I assign a cashier to manage the shop. Obviously when the kids are too young I did it myself but these days I can let the bigger 3 possibly even biggest 5 take turns. I oversee as the shop owner till I know everyone has the process down. There is a paper to fill out when supplies are low in case I didn't notice too. These days the cashier job is coveted and rotates to allow all the enjoyment of learning.

Previously I did change pricing in the middle because ice cream was such a big hit the kids were buying it every snack and it got very costly. This was a great lesson in supply and demand affected consumer cost. 

All in all this is NOT a 5 second activity to prepare the first year but totally worth it! Kids love the process, it does not cost more than you already spend AND lasts for years! 

Good luck making your own. Please leave me feedback if you do letting me know how it worked for you!


Thursday, June 20, 2013

Pasta potential

Yesterday we started with one of the many pasta crafts I have seen/read about on Pinterest and in Family Fun magazine. Frankly to a pre K girly anything with food coloring seems exciting so why not?
Here we took rotini noodles and added what started to be 2T of alcohol along with a few drops of coloring.

 BUT well if you have ever cooked with me you know that I rarely follow a recipe as stated. SO, we added a whole bunch more alcohol so the noodles were mostly saturated but not completely and as many drops as our little heart was content to use.


This transitioned into a wonderful discussion of mixing colors to which we did an experiment directly on the foil. Sadly someone had used all the blue before I could stop her and I barely managed to make green noodles when she pointed out the noodles were already yellow ( as she used yellow food coloring drops on top). Good point green it will now be.
Now let me say that although my original source called for lining cookie sheets with foil to dry I used a paper towel instead. I also left them outside because the smell was a bit much but thankfully once dry overnight (I did bring them back indoors when it got dark) there was no overwhelming odor.


 For my preschool classes at church these will serve as an excellent pre-service activity once I attach rods to board for them to be dropped on. More pics on that to come... PLUS we are trying our hand at coloring spaghetti noodles too. I just don't know if they will remain soft to play with beyond the day you make them. It is just terrible to get paid to create these things I tell ya :) Stay tuned!

Monday, June 17, 2013

Stealing time with sweet C man

In case I haven't made it clear I ADORE my time with my kids, including my niece and nephew. In fact as this week begins knowing that it includes only the quad I am a bit uncertain what to do with us. I mean the weekends, evenings and time off throughout the year are focused on our little family but well summer is supposed to be the 6 pack. Aging kids mean there are more camps and activities to pull away from our lazy days together thus this unusual week. In fact pretty much this whole month includes people here, there and everywhere. I digress so back to our topic at hand, C-man. My dad began calling all the kids by their first initial doing so for C and K because well they are part of the family. C is similar to Michael in many ways but yet they do differ. C would rather hang with the adults if the rest of the kids are zoned in on the tv for too long. I used to refer to him as my shadow when he was there prior to starting Kindergarten.
These days I rarely have that time with just him. But when it happened just last week it was worth the wait. We ran an errand and made a stop just so he and E could look around (of course being the cool Aunt and buying him a couple things). He was polite and grateful not expecting me to buy anything. He clearly enjoyed having someone littler than him to boss a bit though she did not. He chattered away and we laughed the whole time. Then we came home and E went to nap leaving just us two. Since he loves to help in the kitchen we decided to make a treat for the rest of the crew when they all arrived back at the house just a couple hours later. Despite his picky thoughts for a few of my suggestions we went with an oldy but goodie.

 First get choc chip cookies and ice cream flavor of your choice. We chose Chips Ahoy because those are the only kind without eggs for littlest. Vanilla was the only flavor we had but I have loved to do many different flavors in the past.
I scooped it out, smoothed the sides so they would roll easy for C-man. He happily made a variety of mixtures with sprinkles, red hots and choc chips. On top of that he made a few dedicated to specific cousins fav colors too.


                          YUMMY! The chef simply MUST taste test :) It is so fun watching this guy grow!

Sunday, June 9, 2013

Finally Friday

JUMP week is a 4 day week giving all the final day to recoup. Though earlier in the week the kids thought we would head to Six Flags this day I knew they would change their minds. Unbeknownst to me Friday was national doughnut day. I guess great minds think alike because that is just what we made at snack time.
Crazy girl insists on wearing booty shorts and half tops all the time thanks to cheer.

K and C man were the first to jump in.

Annabeth (lover of ice cream AND doughnuts) appeared
YUMMY!
                               After swimming, baseball grounder and pop fly practice taught by the big sisters every rested. Cousin K was the only one motivated to help me with this school classroom project. I intended to let them all make some for here but this is as far as we got together. Next week will be another busy one with my big 3 at Strong Tower Ranch Click it here to see more . The littlest and cousins will be at VBS in the am with K at another camp in afternoon of the first half of the week. Look forward to maybe, just maybe classroom set up details and possibly a silly thing or two with Evangelene and her BFF who will join us a bit.                                                              


how to here

Friday, June 7, 2013

A week goes by AND..

A whole week of summer has passed me by and big fat ZERO entries from me. Why you ask? OK I know none of you actually asked but play along a bit please.....

JUMP that's why. What is JUMP? Well only the biggest, most amazing VBS/summer camp any kid could possibly attend. It is like a carnival, water park, and VBS experience all wrapped into one. My oldest son has been attending since he was 4 years old and the rest began as soon as they were 5 and could. Not a single one of them have ever asked to stay home. In fact they ALL talk about it all year. 
Check it out for yourself click here

Crazy hair day is pictured above, low and behold sucker girl won in her area.
The picture to the right is after pick up on the last day. Littlest and big sis are cheerleaders through and through.


As you can see this filled all our fun play time. However I managed to stay busy working on some remodeling to my classroom. I wish I could report it was done, but there is significant progress made. Hopefully in another week with bits of time spent I will have more to report on that front.Now in lieu of anything else exciting to share let me include an organizational tip that has worked for me.

Having 4 kids and a firefighter husband means I have to figure out how to get each person to whatever activity is scheduled for any given day. The girls cheer and dance is set nights but the boys are constantly changing. Once upon a time I had it all contained in my brain but well..... lately I can't seem to be certain I remember every detail. SO.... ta da the schedule ring.


Basically one 3x5 card per day of the week you need. For the month of May I needed one for every day of the week but in June things go back to normal (if needing one for 4-5 days a week is normal). I wrote dates for ball games since those were not day of the week specific too. I think I may need to make 2 so hubby doesn't steal it on his off days. 

Hope this helps you too.
Until we meet, or rather you read again. Happy crafty!

Thursday, May 30, 2013

Outdoor waterbed WHAT?

Thursday it tis... Tis no better day than today, HA! Needless to say most days will be wonderful ahead since my greatest responsibility is to create fun for the crew. Pinterest is definitely a source of unique ideas and the big girls totally get into checking out plans for us to make. This particular one I noticed a month or more ago intending to complete in the hot days of summer as and excuse to keep kids outside a bit longer. But you know what they say about best laid plans...

For directions click here

 It was super windy so we taped it in the garage and then brought outside as a team to fill with water. There were many mi nor leaks as we did NOT do the best taping job to begin with.. my helpers were a little less experienced.


 At first everyone took things easy treating it like a slip and slide. BUT then they realized kids can be kids and make anything like a party.


I managed to capture C-man and Evangelene mid air.
Alas the inevitable happened and a foot placed in just the wrong spot made a whole. The girls decided to make it bigger and play anyway. Turns out this was a great idea and because it made things SPLASH!
 It was the best hour and half of fun! I plan on doing it again, this time taking more effort in taping the edges better too. I did use 2 mil tarp and not the kind that tore into sheets like the original post mentioned. I simply folded it in half and taped. This was simple, easy and cheap. Good luck making your own water fun!